Serverless Python Web Applications With AWS Lambda and Flask

This is the first part of a series on serverless development with Python. Next part.

Serverless applications are great from the perspective of a developer – no infrastructure to manage, automatically scaling to meet requests without ever having to think about it, pay by the RAM gigabyte/second, and the ability to deploy via code however you desire. Logging comes free. For DevOps folks it’s a nightmare, as it represents the rapidly approaching obsolescence of their skills involving setting up web servers, load balancing, monitoring, logging, hanging out in datacenters, and other such quaint aspects of deploying web applications. Making a traditional web application run on AWS Lambda is not quite trivial yet, but is well worth understanding and considering next time you need a web service somewhere and it will surely get smoother and easier with time.

Oh yeah, what’s serverless mean here? It means you don’t manage any servers or long-lived processes. You put code in the cloud, and you run it whenever you want, however much you want, and don’t have to worry about the scaling part, while paying for only the CPU, memory, network traffic, and other services you consume. It’s a completely different way of deploying an application compared to managing daemons and servers and infrastructure and load balancing and all fun stuff that has very little to do with the code you want to write and deploy.

Python And Flask

There’s no shortage of options for web frameworks, and you can do a lot worse than Python 3 with Flask. Flask is a nice mixture of being able to create a simple web service with very little boilerplate, but also can also be used as a component for building more complex web applications, with the caveat that it’s more suited to APIs rather than server-side rendered apps when compared with something like Django. You should probably be writing single-page apps these days anyway.

Python is a very well-supported, readable, maintainable language with a vast amount of libraries available on the python module index. If you take the time to set up lint with mypy and flake8 you can even have some up-front checking of types and common mistakes. And it’s supported by AWS Lambda.

What A Serverless Flask Application Looks Like

To build a serverless Lambda application you should have a CloudFormation configuration template that describes your architecture.

The Lambda itself is one piece of this architecture; it is a function that can be invoked and can return a result. To use it as a web service, there needs to be a way to reach it from the web. AWS provides the API Gateway service which can listen for HTTP(S) requests on an endpoint and do something when requested. APIGW can either have an entry for each endpoint you desire (POST /api/foo,  GET /api/bar, etc…) or it can proxy any request at a given host and path prefix to a Lambda and then interpret the response as an HTTP response to send back to the requestor. In this way it works like CGI or WSGI, and as long as your web framework knows how to deserialize an API Gateway proxy request and then serialize the response back into the format the APIGW expects, it can appear as any other web application “container” to your app.

There is a very simple Flask extension for this – AWSGI. The example there shows everything you need to do to make a web application that runs as a serverless app:

Screen Shot 2018-08-29 at 21.54.26.png

The only thing that is really Lambda-specific is the lambda_handler, which gives Flask the WSGI request object it expects and then translates the response appropriately into the format AWSGI expects.

So between the Lambda hosting your application code and the API Gateway acting as its reverse proxy, your infrastructure is pretty clear at this point. There are some associated bits needed like IAM permissions and the like, and maybe a database or S3 bucket or whatever else your app requires. This can all be specified in the CloudFormation template.

AWS has CloudFormation “transforms” that simplify this configuration by providing templated resources for your template to use. Templates on templates is a truly auspicious way to declare configuration. You will harness more slack than you had previously dreamed possible.

Resources:
    HelloWorldFunction:
        Type: AWS::Serverless::Function
        Properties:
            CodeUri: hello_world/build/
            Handler: app.lambda_handler
            Runtime: python3.6
            Events:
                HelloWorld:
                    Type: Api
                    Properties:
                        Path: /hello
                        Method: get

This gives you a Lambda that runs code uploaded to a S3 bucket when invoked at /hello.

Deployment

Deployment is not yet quite as smooth as say, deploying your application to Heroku, but it is getting there. There do exist some popular tools for doing serverless orchestration like Serverless Framework but I’ve been trying to see how far I can get just using AWS’s native tooling.

AWS has a service that I think no one but myself has actually used called CodeStar. This sets up a serverless deployment pipeline for you automatically, configuring CodePipeline, CodeBuild, and CloudFormation to give you an entire CI/CD system. You can easily configure it to run a build every time you check something into a GitHub repo, and update a CloudFormation deployment automatically. In addition, it even has another level of template laziness in the form of the CodeStar CloudFormation transform.

The documentation on CodeStar and the transform is more or less non-existent, which makes it actually kind of a special challenge to use. However it does appear to take care of the step of uploading your code to an S3 bucket and providing some roles. Your CodeStar template.yml may look something like:

  Flask:
    Type: AWS::Serverless::Function
    Properties:
      Timeout: 10
      Handler: myapp/index.lambda_handler
      Runtime: python3.6
      Role:
        Fn::ImportValue:
          !Join ['-', [!Ref 'ProjectId', !Ref 'AWS::Region', 'LambdaTrustRole']]

If you create a repository with the file myapp/index.py, with a lambda_handler function like the AWSGI handler previously shown, then you now have a serverless web application that will be updated every time you push to your GitHub repo and CodeBuild passes.

Note that CodeStar may have the potential to make developing serverless applications as easy as Heroku with the power of everything you get from AWS and CloudFormation, but it definitely feels today like something no one has actually tried to use. I attempted to add an IAM role to my Lambda function and I managed to stump AWS support. They finally admitted to me that there is no documented way to customize the IAM role:

“After some further testing and research into this I found that you cannot currently customize the serverless Lambda function’s IAM Role from the template.yml.

Instead, you will need to manually add the desired permissions to the IAM Role directly. As you pointed out though, the Lambda function’s role is created automatically and you do not have insight into how to identify the IAM Role being used.”

There is a workaround involving deducing how the role name is derived in the CodeStar transform (which is a rather opaque and mystical bit of machinery) and adding permissions to it, but as far as I’m aware none of this is really supported or documented. They said they plan to fix it though.

You absolutely do not have to use CodeStar for deploying Lambdas, but if you relish a little bit of a challenge with some of the more esoteric AWS services it can be a valuable tool depending on your needs. There’s always some satisfaction at watching unloved AWS services grow and mature over the years (CodeDeploy…) and you can tell war stories about arguing with AWS support reps for months on a single ticket.

Speaking of which, when I tried using CodeBuild for running tests for my project they didn’t have a python 3.6 image, making that tool completely useless. Looks like they have one now though, so maybe not useless anymore.

Other Deployment Options

If you really just want to whip up a quick Lambda, you really don’t need a whole CI/CD system or CloudFormation of course. If you just want to write some code and run it and then not worry about it anymore, you can set it all up manually as a one-off function. I do this for some things like Slack bots and random little web services. I use Sublime Text 3 with an AWS Lambda editor plugin that I made. It lets you edit a Lambda directly from within Sublime, and uploads a new version whenever you hit save. It lets you invoke it and view the output within Sublime, and it has a handy shortcut for adding dependencies via pip to your project. It’s incredibly simple and vastly superior to using the web-based function editor, or unzipping and rezipping your bundle every time you want to modify the code.

Dependencies

Screen Shot 2018-08-29 at 23.15.50

Your Lambda is actually just distributed as a zip file of a directory. Into this directory goes your application code as well as any data files or dependencies it needs, along with your hopes and dreams. If you depend on other libraries (besides boto3, which Lambda already has for your convenience), you need to include them.

For a simple deployment, you can copy in libraries installed into a virtualenv for your project. If the libraries include native code, you must compile it on a linux amd64 machine because that’s what Lambda runs on. Some tools automate this with docker.

If you want something a little more friendly to use, you can set up a directory to stuff things in.

For my project, I made a dumb little “local pip” script that I can use to install packages with pip into a directory (“vendor/”). It’s nothing special or fancy. Just runs “pip install -t …” and deletes some unnecessary files afterwards.

In my application’s __init__.py file at the top I add vendor and the root path to PYTHONPATH, sort of giving me a mini-venv where I can just use any module installed to vendor/:

import os
import sys
vendor_path = os.path.abspath(os.path.join(__file__, '..', '..', 'vendor'))
lib_path = os.path.abspath(os.path.join(__file__, '..', '..'))
sys.path.append(lib_path)
sys.path.append(vendor_path)
from flask import Flask
...

And then any dependencies I package up can be imported easily.

Putting It Together

To experiment with CodeStar and serverless Flask I made a simple web application. It lets people ask a question or answer a question. It was created initially as a Slack app, although that didn’t quite go as I hoped.

An Aside: My goal was to allow anyone on Slack to receive the questions and answer them, but as I had it only hooked up to a Slack team full of trolls and degenerates the Slack app reviewer was extremely unimpressed with the quality and thoughtfulness of the responses he got when testing it. Which is entirely my fault, but whatever. It’s still available on the Slack app repository but since they wouldn’t permit it to work across teams (something about not being “appropriate for the workplace”?) the Slack interface is of limited usefulness.

Anywhoozlebee, the application is a simple one: allow users to ask questions, or respond to questions. It was implemented first as a web service compatible with the Slack webhooks and Slashcommand HTTP APIs, and then later as a REST API for the web.

If this was a serious project I would use PostgreSQL for a database, but in addition to trying to teach myself how to best design a serverless Flask application, I also wanted to spend as little money as possible hosting it. Unfortunately PostgreSQL is not exactly serverless at this point in time, and you can expect to spend at least tens of dollars a month on AWS if you want a PostgreSQL server on anything except a free tier micro EC2 instance. So I decided to try using AWS’s DynamoDB nosql… thing. It’s a pretty unpleasant key-value store and the boto3 documentation is written by a sadist, but it is cheap and can also scale a lot without having to care much. In theory anyway. Though apparently it sucks?

DynamoDB costs a few bucks a month for tables and indexes, although you can probably get by with one or two if you don’t try to do things like you would in a relational database. Between that and a million requests and 400,000 GB-seconds of compute time a month for free for Lambda, you can have some code run and a place to store data for peanuts. And it should scale horizontally without any effort or thought. I’m sure it’s not that simple in reality, but it’s nice to imagine. At least I never have to configure a webserver or administer a machine just to deploy a web application, and can do it on the (hella) cheap. One of the real values of serverless applications is the ability to just set something up once and then never worry about it again. If it works the first time, it’ll keep working. You don’t need to worry about disks dying or backups or dealing with traffic spikes or downtime. Sure AWS isn’t absolutely perfect but I sure trust them to keep my lambdas running day and night more than I trust most people, including myself. Especially including myself.

Secrets

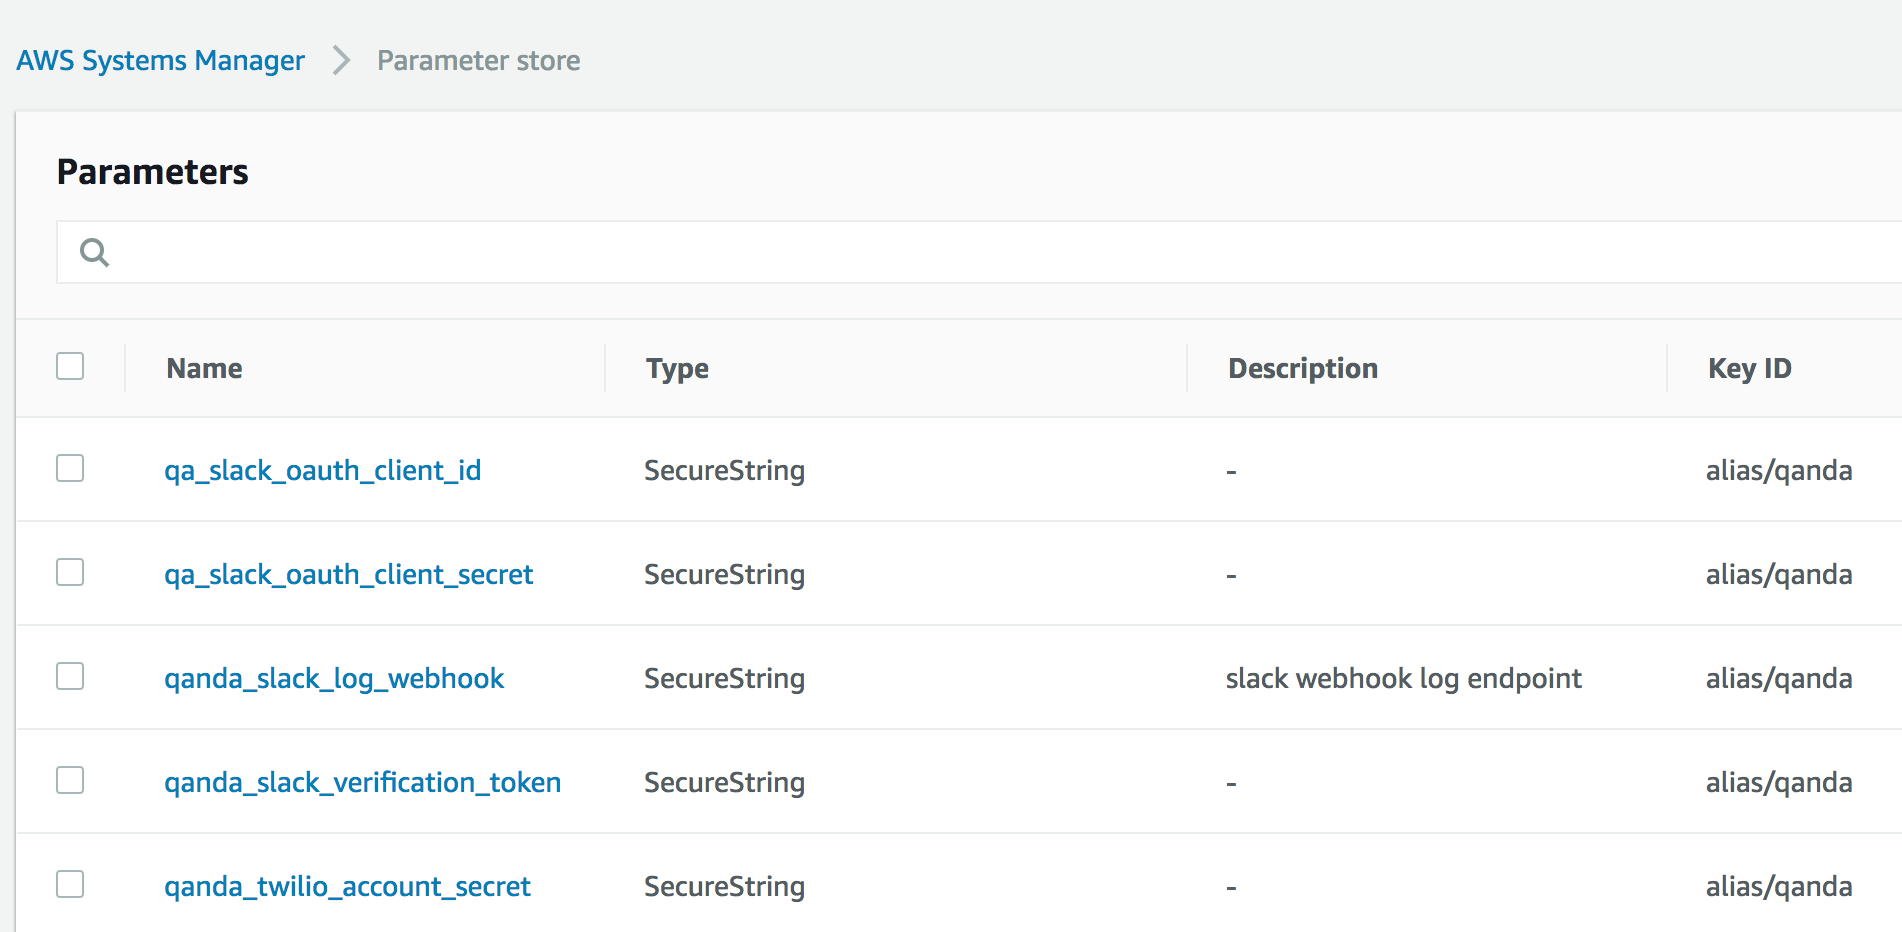
With any application deployment, you will likely need to store some secrets. You don’t need to give your Lambda an AWS API key as it is invoked with an IAM role that you can grant access to the services it needs. For external services, you can use the AWS SSM Parameter Store. It just lets you store secrets and retrieve them if your role or user is granted permissions to read them. It’s a great place to store things like API keys and tokens.

Screen Shot 2018-08-29 at 23.47.30

Since we’re using Flask, we can easily integrate SSM Parameter Store with the Flask config.py:

import boto3
ssm = boto3.client('ssm')

def get_ssm_param(param_name: str, required: bool = True) -> str:
    """Get an encrypted AWS Systems Manger secret."""
    response = ssm.get_parameters(
        Names=[param_name],
        WithDecryption=True,
    )
    if not response['Parameters'] or not response['Parameters'][0] or not response['Parameters'][0]['Value']:
        if not required:
            return None
        raise Exception(
            f"Configuration error: missing AWS SSM parameter: {param_name}")
    return response['Parameters'][0]['Value']

TWILIO_API_SID = get_ssm_param('qanda_twilio_account_sid')
TWILIO_API_SECRET = get_ssm_param('qanda_twilio_account_secret')
SLACK_OAUTH_CLIENT_ID = get_ssm_param('qa_slack_oauth_client_id')
SLACK_OAUTH_CLIENT_SECRET = get_ssm_param('qa_slack_oauth_client_secret')
SLACK_VERIFICATION_TOKEN = get_ssm_param('qanda_slack_verification_token')
SLACK_LOG_ENDPOINT = get_ssm_param('qanda_slack_log_webhook', required=False)

Secrets status: secreted.

Running Locally

Because Lambdas run inside of AWS, you might think that it would be very cumbersome to have to deploy and test every code change you make using AWS. And that would suck, if you actually had to do that. There’s an AWS project called SAM-CLI – Serverless Application Model Command Line Interface. Using docker Lambda images, you can invoke your application within the same environment it would be running under on Lambda. You can either feed it a JSON file describing a Lambda request and view the response, or you can start it up as a server that you can connect to like any other local development webserver. You do have to provide an AWS API key though if you want your app to make use of AWS services, as it’s running on your local machine and not under the auspices of an instance role in AWS.

Further Examples

In summary the above are considerations that are necessary for creating and deploying a serverless web application. I’m pretty pleased with the way everything fit together in my learning project QandA and I invite you to look at the project structure and source code for a complete working example. There are some more details I could go into about how I structured the Flask application, but they aren’t really Lambda- or serverless-specific and if you’re interested, really just check out the code.

Serverless API

Lambda is still in the early days and far from mature, and not yet as easy to work with as Heroku. But there is a high upside to being able to just have “code running in the cloud” without having to think about it or manage any server, and for basically free. Once you’ve taken the small amount of effort to set up a serverless application, you’re rewarded with an easy way to run code on the internet without having to worry about anything below the level of “request -> application code -> response”. I prefer worrying about code and configuration files over managing infrastructure and servers.

Heroku logging to AWS Lambda

If you use heroku and AWS and want to customize your heroku application logging, you can hook Logplex up to AWS Lambda.

Background

When a heroku application emits things to stdout or stderr they get shuttled to the magical world of Logplex. The logs enter as syslog messages, containing information like facility, priority, etc. Not only logs from your application but logs from heroku’s build and deploy systems, postgresql, and other add-ons as well. Shortly after arrival these logs are dispatched to whatever sinks your heroku app has configured which can go to add-ons like PaperTrail, and also to custom log sink URLs. The sink destinations can be syslog(+TLS) or syslog-over-HTTPS using octet counting framing.

One advantage of this setup is that you can have your application emit logs with a minimum of blocking. At one point I had my application sending logs to Slack directly but this caused latency in the application any time I logged anything. By sending to Logplex on the other hand, I can process the application messages asynchronously without doing anything remotely fancy in my application. Another benefit is that you can handle your application, database, build, and deploy logs all the same unified fashion.

Using AWS API Gateway and Lambda you can set up your own Logplex sink and can do whatever you desire with the logs coming out of Logplex. This includes your application’s output as well as add-ons and heroku platform messages. You can them send them into CloudWatch Logs, or even Slack as in this example:

"""Sample handler for parsing Heroku logplex drain events (https://devcenter.heroku.com/articles/log-drains#https-drains).
Expects messages to be framed with the syslog TCP octet counting method (https://tools.ietf.org/html/rfc6587#section-3.4.1).
This is designed to be run as a Python3.6 lambda.
"""
import json
import boto3
import logging
import iso8601
import requests
from base64 import b64decode
from pyparsing import Word, Suppress, nums, Optional, Regex, pyparsing_common, alphanums
from syslog import LOG_DEBUG, LOG_WARNING, LOG_INFO, LOG_NOTICE
from collections import defaultdict
HOOK_URL = "https://" + boto3.client('kms').decrypt(CiphertextBlob=b64decode(ENCRYPTED_HOOK_URL))['Plaintext'].decode('ascii')
CHANNEL = "#alerts"
log = logging.getLogger('myapp.heroku.drain')
class Parser(object):
def __init__(self):
ints = Word(nums)
# priority
priority = Suppress("<") + ints + Suppress(">")
# version
version = ints
# timestamp
timestamp = pyparsing_common.iso8601_datetime
# hostname
hostname = Word(alphanums + "_" + "-" + ".")
# source
source = Word(alphanums + "_" + "-" + ".")
# appname
appname = Word(alphanums + "(" + ")" + "/" + "-" + "_" + ".") + Optional(Suppress("[") + ints + Suppress("]")) + Suppress("-")
# message
message = Regex(".*")
# pattern build
self.__pattern = priority + version + timestamp + hostname + source + appname + message
def parse(self, line):
parsed = self.__pattern.parseString(line)
# https://tools.ietf.org/html/rfc5424#section-6
# get priority/severity
priority = int(parsed[0])
severity = priority & 0x07
facility = priority >> 3
payload = {}
payload["priority"] = priority
payload["severity"] = severity
payload["facility"] = facility
payload["version"] = parsed[1]
payload["timestamp"] = iso8601.parse_date(parsed[2])
payload["hostname"] = parsed[3]
payload["source"] = parsed[4]
payload["appname"] = parsed[5]
payload["message"] = parsed[6]
return payload
parser = Parser()
def lambda_handler(event, context):
handle_lambda_proxy_event(event)
return {
"isBase64Encoded": False,
"statusCode": 200,
"headers": {"Content-Length": 0},
}
def handle_lambda_proxy_event(event):
body = event['body']
headers = event['headers']
# sanity-check source
assert headers['X-Forwarded-Proto'] == 'https'
assert headers['Content-Type'] == 'application/logplex-1'
# split into chunks
def get_chunk(payload: bytes):
# payload = payload.lstrip()
msg_len, syslog_msg_payload = payload.split(b' ', maxsplit=1)
if msg_len == '':
raise Exception(f"failed to parse heroku logplex payload: '{payload}'")
try:
msg_len = int(msg_len)
except Exception as ex:
raise Exception(f"failed to parse {msg_len} as int, payload: {payload}") from ex
# only grab msg_len bytes of syslog_msg
syslog_msg = syslog_msg_payload[0:msg_len]
next_payload = syslog_msg_payload[msg_len:]
yield syslog_msg.decode('utf-8')
if next_payload:
yield from get_chunk(next_payload)
# group messages by source,app
# format for slack
srcapp_msgs = defaultdict(dict)
chunk_count = 0
for chunk in get_chunk(bytes(body, 'utf-8')):
chunk_count += 1
evt = parser.parse(chunk)
if not filter_slack_msg(evt):
# skip stuff filtered out
continue
# add to group
sev = evt['severity']
group_name = f"SEV:{sev} {evt['source']} {evt['appname']}"
if sev not in srcapp_msgs[group_name]:
srcapp_msgs[group_name][sev] = list()
body = evt["message"]
srcapp_msgs[group_name][sev].append(str(evt["timestamp"]) + ': ' + evt["message"])
for group_name, sevs in srcapp_msgs.items():
for severity, lines in sevs.items():
if not lines:
continue
title = group_name
# format the syslog event as a slack message attachment
slack_att = slack_format_attachment(log_msg=None, log_rec=evt)
text = "\n" + "\n".join(lines)
slack(text=text, title=title, attachments=[slack_att], channel=channel, severity=severity)
# sanity-check number of parsed messages
assert int(headers['Logplex-Msg-Count']) == chunk_count
return ""
def slack_format_attachment(log_msg=None, log_rec=None, title=None):
"""Format as slack attachment."""
severity = int(log_rec['severity'])
# color
color = None
if severity == LOG_DEBUG:
color = "#aaaaaa"
elif severity == LOG_INFO:
color = "good"
elif severity == LOG_NOTICE:
color = "#439FE0"
elif severity == LOG_WARNING:
color = "warning"
elif severity < LOG_WARNING:
# error!
color = "danger"
attachment = {
# 'text': "`" + log_msg + "`",
# 'parse': 'none',
'author_name': title,
'color': color,
'mrkdwn_in': ['text'],
'text': log_msg,
# 'fields': [
# # {
# # 'title': "Facility",
# # 'value': log_rec["facility"],
# # 'short': True,
# # },
# # {
# # 'title': "Severity",
# # 'value': severity,
# # 'short': True,
# # },
# {
# 'title': "App",
# 'value': log_rec["appname"],
# 'short': True,
# },
# # {
# # 'title': "Source",
# # 'value': log_rec["source"],
# # 'short': True,
# # },
# {
# 'title': "Timestamp",
# 'value': str(log_rec["timestamp"]),
# 'short': True,
# }
# ]
}
return attachment
def filter_slack_msg(msg):
"""Return true if we should send to slack."""
sev = msg["severity"] # e.g. LOG_DEBUG
source = msg["source"] # e.g. 'app'
appname = msg["appname"] # e.g. 'heroku-postgres'
body = msg["message"]
if sev >= LOG_DEBUG:
return False
if body.startswith('DEBUG '):
return False
# if source == 'app' and sev > LOG_WARNING:
# return False
if appname == 'router':
return False
if appname == 'heroku-postgres' and sev >= LOG_INFO:
return False
if 'sql_error_code = 00000 LOG: checkpoint complete' in body:
# ignore checkpoint
return False
if 'sql_error_code = 00000 NOTICE: pg_stop_backup complete, all required WAL segments have been archived' in body:
# ignore checkpoint
return False
if 'sql_error_code = 00000 LOG: checkpoint starting: ' in body:
# ignore checkpoint
return False
if appname == 'logplex' and body.startswith('Error L10'):
# NN messages dropped since...
return False
return True
def slack(text=None, title=None, attachments=[], icon=None, channel='#alerts', severity=LOG_WARNING):
if not attachments:
return
# emoji icon
icon = 'mega'
if severity == LOG_DEBUG:
icon = 'information_source'
elif severity == LOG_INFO:
icon = 'information_desk_person'
elif severity == LOG_NOTICE:
icon = 'scroll'
elif severity == LOG_WARNING:
icon = 'warning'
elif severity < LOG_WARNING:
# error!
icon = 'boom'
message = {
"username": title,
"channel": channel,
"icon_emoji": f":{icon}:",
"attachments": attachments,
"text": text,
}
print(message)
slack_raw(message)
def slack_raw(payload):
response = requests.post(
HOOK_URL, data=json.dumps(payload),
headers={'Content-Type': 'application/json'}
)
if response.status_code != 200:
raise ValueError(
'Request to slack returned an error %s, the response is:\n%s'
% (response.status_code, response.text)
)


Drawbacks

There is one major deficiency in this system that is worth noting: there is no way for your application to alter the log message’s syslog fields. So even if your application logger knows a particular message is debug, or warn, or error, it all comes across as severity level 6 (info). Logs from other components such as postgresql preserve their log severities but your application is a second-class citizen and there is no mechanism to send actual syslog messages to Logplex even though add-ons and internal heroku machinery clearly does. I filed a ticket about this and complained at length and they told me they have no plans to allow users to send syslog-formatted messages to Logplex, and everyone is stuck with only stdout/stderr. This means if you wish to treat messages of differing severities differently in your Logplex sink you can’t, at least not with the existing out-of-band syslog data that your sink receives. As far as the sink can tell all of your application debug logs and error logs all look the same, which is frankly an impossible situation when it comes to logging. Hopefully they fix this some day.

AWS Lambda Editor Plugin for Sublime Text

Editing the source of a lambda procedure in AWS can be very cumbersome. Logging in with two-factor authentication and then selecting your lambda and using their web-based “IDE” with nested scroll bars going on on the page is not the greatest. Even worse is if your function actually has dependencies! Then you cannot view the source on the web and must download a zip file, and re-zip and upload it every time you wish to make a change.

Naturally after a while of doing this I got pretty fed up so I created a handy plugin (documentation and source on GitHub) for my editor of choice these days, Sublime Text. After setting up your AWS access key if you haven’t done so already (it uses the awscli or boto config) and installing the plugin via the Sublime Package Manager, you can call up a list of lambdas from within your editor.

After selecting a lambda to edit, it downloads the zip (even if it wasn’t originally a zip), sticks it in a temporary directory and creates a sublime project for you. When you save any of the files it will automatically zip up the files in the project and update the function source automatically, as if you were editing a local file. Simplicity itself.

If you use AWS lambda and Sublime Text, get this plugin! It’ll save you a ton of time. Watch it in action:


Video instructions for installing the plugin from scratch:

Developing a cloud-based IoT service

In my previous post I describe my adventures in building an AWS IoT-enabled application for a proprietary embedded linux system and getting it to run. The next step in our journey is to create a service that communicates with our device and controls it in a useful way.

What can we do with a system running with the aws_iot library? We can use the MQTT message bus to subscribe to channels and publish messages, and we can diff the current device state against the desired device state shadow stored on the server. Now we need the service side of the puzzle.

My sample IoT application is to be able to view images on an IP camera from anywhere on the internet. I’m planning to incorporate live HD video streaming as well but that is a whole other can of worms we don’t need to open for this demonstration. My more modest goal for now will be to create a service where I can request a snapshot from the camera be uploaded to AWS’s Simple Storage Service (S3) which can store files and serve them up to authenticated users. In addition I will attempt to build the application server logic around AWS Lambda, a service for running code in response to events without actually having to deploy a server or run a daemon of any sort. If I can manage this then I will have a truly cloud-based service; one that does not consume any more resources than are required to perform its job and with no need to pre-allocate any servers or storage. It will be running entirely on Amazon’s infrastructure with only small bits of configuration, policy and code inserted in the right places to perform the relatively simple tasks required of my app. This is the Unemployed DevOps lifestyle, the dream of perfect lazy scalability and massive offloading of effort and operations to Amazon. There is of course a large downside to this setup, namely that I am at the mercy of Amazon. If they are missing a feature I need then I’m pretty much screwed and if their documentation is poor then I will suffer enormously. A partial description of my suffering and screwed state continues below.

I’ve been bitten before by my foolish impetuousness in attempting to use new AWS services that have clearly not been fully fleshed out. I was an early adopter of the CodeDeploy system, a super useful and nifty system for deploying changes to your application on EC2 instances from S3 or even straight from GitHub. Unfortunately it turned out to not really be finished or tested or documented and I ended up wasting a ton of time trying to make it work and deal with corner cases. It’s a dope service but it’s really painfully clear nobody at AWS has ever bothered to actually try using it for a real application, and all of my feature requests and bug reports and in-person sessions with AWS architects have all resulted in exactly zero improvements despite my hours of free QA I performed for them. As a result I am now more cautious when using new AWS services, such as IoT and Lambda.

In truth attempting to make use of the IoT services and client library has been one of the most frustrating and difficult uphill battles I’ve ever waged against a computer. The documentation is woefully incomplete, I’ve wasted tons of time guessing at what various parameters should be, most features don’t really behave as one would expect and the entire system is just super buggy and non-deterministic. Sometimes when I connect it just fails. Or when subscribing to MQTT topics.

Usually this doesn't happen. But sometimes it does!
Usually this doesn’t happen. But sometimes it does!

Why does it disconnect me every few seconds? I don’t know. I enabled autoReconnect (which is a function pointer on a struct unlike every other function) so it does reconnect at least, except when it just fails for no apparent reason.

setAutoReconnectStatus is only mentioned as being a typedef in the MQTT client documentation. One would assume you should call the function aws_iot_mqtt_autoreconnect_set_status(), but the sample code does indeed call the struct’s function pointer instead. No other part of the library uses this fakeo method call style.

On the boto3 (python AWS clienet library) side things are not really any better. The device shadow support (called IoT Dataplane) documentation is beyond unhelpful at least as of this writing. If you want to update a device state dictionary (its “shadow”) in python, say, in a lambda, you call the following method:

Usually when you want to specify a dictionary-type object as a param in python it’s customary to pass it around as a dict. It’s pretty unusual for an API that is expecting a dictionary data structure to expect you to already have encoded it as JSON, but whatever. What is really missing in this documentation is the precise structure of the update payload JSON string you’re supposed to pass in. You’re supposed to pass in the desired new state in the format {“state”: { “desired”: { … } } }:

My dumb lambda

If you hunt around from the documentation pages referenced by the update_thing_shadow() documentation you may uncover the correct incantation, though not on the page it links to. It would really save a lot of time if they just mentioned the desired format.

I really definitely have no reason why it wants a seekable object for the payload since it’s not like you can really send files around. I actually first attempted to send an image over the IoT message bus with no luck, until I realized that the biggest message that can ever be sent over it is 128k. This application would be infinitely simpler if I could transmit the image snapshot over my existing message bus but that would be too easy. I am fairly certain my embedded linux system can handle buffering many megabytes of data and my network is pretty solid, it’s really a shame that AWS is so resource-constrained!

The reason I am attempting to use the device shadow to communicate is that my current scheme for getting an image from the device into AWS in lieu of the message bus is:

  • The camera sends a MQTT message that indicates it is online
  • When the message is received, a DevicePolicy matches the MQTT topic and invokes a lambda
  • The lambda generates a presigned S3 request that will allow the client to upload a file to an S3 bucket
  • The lambda updates the device shadow with the request params
  • A device shadow delta callback on the camera is triggered (maybe once, maybe twice, maybe not at all, by my testing)
  • Callback receives the S3 request parameters and uploads the file via libcurl to S3
  • Can now display thumbnail to a web client from S3

I went to the AWS Loft to talk to an Amazon architect, a nice free service the company provides. He didn’t seem to know much about IoT, but he spoke with some other engineers there about my issues. He said there didn’t appear to be any way to tell what client sent a message, which kind of defeats the entire point of the extra security features, and he was going to file an internal ticket about that. As far as uploading a file greater than 128k, the above scheme was the best we could come up with.

Regarding the security, I still am completely at a loss as to how one is supposed to manage more than one device client at a time. You’re supposed to create a “device” or a “Thing”, which has a policy and unique certificate and keypair attached to it and its own device shadow state. I assume the keypair and device shadows are supposed to be associated with a single physical device, which means you will need to automate some sort of system that provisions all of this along with a unique ThingName and ClientID for each physical device and then include that in your configuration header and recompile your application. For each device, I guess? There is no mention of what exactly how provisioning is supposed to work when you have more than one device, and I kinda get the feeling nobody’s thought that far ahead. Further evidence in support of this theory is that SNS messages or lambdas that are invoked from device messages do not include any sort of authenticated ClientID or ThingName, so there’s no way to know where you are supposed to deliver your response. Right now I just have it hard-coded to my single Thing for testing. I give Amazon 10/10 for the strict certificate and keypair verification, but that’s only one part of a scheme that as far as I can tell has no mechanism for verifying the client’s identity when invoking server-side messages and code.

It wasn’t my intention to bag on AWS IoT, but after months of struggling to get essentially nowhere I am rather frustrated. I sincerely hope that it improves in usableness and stability because it does have a great deal of powerful functionality and I’d very much like to base my application on it. I’d be willing to help test and report issues as I have in the past, except that I can’t talk to support without going in to the loft in person or paying for a support plan, and the fact that all of my previous efforts at testing and bug reporting have added up to zero fixes or improvements doesn’t really motivate me either.

If I can get this device shadow delta callback to actually work like it’s supposed to I’ll post more updates as I progress. It may be slow going though. The code, such as it is, is here.


Diving into IoT development using AWS

I’m more allergic than most people to buzzwords. I cringe big time when companies suddenly start rebranding their products with the word “cloud” or tack on a “2.0”. That said, I realize that the cloud is not just computers in a datacenter and the Internet of Things isn’t all meaningless hype either. There exists a lot of cool new technology, miniaturization, super cheap hardware of all shapes and sizes and power requirements, ever more rapid prototyping and lot more that adds up to what looks like a new era in embedded system hardware.

People at the embedded linux conference can't wait to tell you about IoT stuff
People at the embedded linux conference can’t wait to tell you about IoT stuff

But what will drive this hardware? There is a lot of concern about the software that’s going to be running on these internet-connected gadgets because we all just know that the security on most of these things is going to be downright laughable, but now since they’re a part of your car, your baby monitor, your oven, your insulin pump and basically everything, this is gonna be a big problem.

So I’ve embarked on a project to try to build an IoT application properly and securely. I think it’ll be fun, a good learning experience, and even a useful product that I may be able to sell one day. At any rate it’s an interesting technical challenge.

My project is thus: to build a cloud-based IoT (ughhh sorry) IP camera for enterprise surveillance. It will be based on as much open source software as possible, ABRMS-licensed, mobile-first and capable of live streaming without any video transcoding.

I think I know how to do this, I’ve written a great deal of real-time streaming software in the past. I want to offload as much as the hard stuff as possible; let the hardware do all the h.264 encoding and let AWS manage all of the security, message queueing and device state tracking.

At the Dublin gstreamer conference I got to chat up an engineer from Axis, an awesome Swedish company that makes the finest IP cameras money can buy. He informed me that they have a new program called ACAP (Axis Camera Application Platform) which essentially lets you write what are essentially “apps” that are software packages that can be uploaded to their cameras. And they’re all running Linux! Sweet!

And recently I also learned of a new IoT service from Amazon AWS. I was dreading the humongo task of writing a whole new database-backed web application and APIs for tracking devices, API keys, device states, authentication, message queueing and all of that nonsense. Well it looks like the fine folks at Amazon already did all the hard work for me!

So I had my first development goal: create a simple AWS-IoT client and get it to run on an Axis camera.

Step one: get access to ACAP

Axis doesn’t really make it very easy to join their development program. None of their API documentation is public. I’m always very wary of companies that feel like they need to keep their interfaces a secret. What are you hiding? What are you afraid of? Seems like a really weird thing to be a control freak about. And it majorly discourages developers from playing around with your platform or knowing about what it can do.

But that is a small trifle compared to joining the program. I filled out a form requesting access to become a developer and was eventually rewarded with a salesbro emailing me that he was busy with meetings for the next week but could hop on a quick call with me to tell me about their program. I informed them that I already wanted to join the program and typed all the relevant words regarding my interest into their form and didn’t need to circle back with someone on a conference call in a few weeks’ time, but they were really insistent that they communicate words via telephone.

After Joe got to give me his spiel on the phone I got approved to join the Axis developer partner program. As far as ACAP they give you a SDK which you can also download as an Ubuntu VirtualBox image. Inside the SDK is a tutorial PDF, several cross-compiler toolchains, some shady Makefile includes, scripts for packaging your app up and some handy precompiled libraries for the various architectures.

Basically the deal is that they give you cross-compilers and an API for accessing bits of the camera’s functionality, things like image capture, event creation, super fancy storage API, built-in HTTP server CGI support, and even video capture (though support told me vidcap super jankity and I shouldn’t use it). The cross-compilers support Ambarella ARM, ARTPEC (a chip of Axis’s design) and some MIPS thing, these being the architectures used in various Axis products. They come with a few libraries all ready to link, including glib, RAPP (RAster Processing Primitives library) and fixmath. Lastly there’s a script that packages your app up, building a fat package for as many architectures as you want, making distribution super simple. Now all I had to do was figure out how to compile and make use of the IoT libraries with this build system.

Building mbedTLS and aws_iot

AWS has three SDKs for their IoT clients: Arduino Yún, node.js and embedded C linux platforms. The Arduino client does sound cool but that’s probably underpowered for doing realtime HD video, and I’m not really the biggest node.js fan. Linux embedded C development is where it is at, on the realz. This is the sort of thing I want to be doing with my life.

Hells yeah!
Word

All that I needed to do was create a Makefile that builds the aws_iot client library and TLS support with the Axis toolchain bits. Piece of cake right? No, not really.

The IoT AWS service takes security very seriously, which is super awesome and they deserve props for forcing users to do things correctly: use TLS 1.2, include a server certificate and root CA cert with each device and give each device a private key. Wonderful! Maybe there is hope and the IoT future will not be a total ruinfest. The downside to this strict security of course is that it is an ultra pain in the ass to set up.

You are offered your choice of poison: OpenSSL or mbedTLS. I’d never heard of mbedTLS before but it looked like a nice little library that will get the job done that isn’t a giant bloated pain in the ass to build. OpenSSL has a lot of build issues I won’t go into here.

To set up your app you create a key and cert for a device and then load them up in your code:

 connectParams.pRootCALocation = rootCA;
 connectParams.pDeviceCertLocation = clientCRT;
 connectParams.pDevicePrivateKeyLocation = clientKey;

Simple enough. Only problem was that I was utterly confused by what these files were supposed to be. When you set up a certificate in the IoT web UI it gives you a public key, a private key and a certificate PEM. After a lot of dumbness and AWS support chatting we finally determined that rootCA referred to a secret CA file buried deep within the documentation and the public key was just a bonus file that you didn’t need to use. In case anyone else gets confused as fuck by this like I was you can grab the root CA file from here.

The AWS IoT C SDK (amazon web services internet of things C software development kit) comes with a few sample programs by way of documentation. They demonstrate connecting to the message queue and viewing and updating device shadows.

#define AWS_IOT_MQTT_HOST              "B13C0YHADOLYOV.iot.us-west-2.amazonaws.com" ///< Customer specific MQTT HOST. The same will be used for Thing Shadow                                                                                                                       
#define AWS_IOT_MQTT_PORT              8883 ///< default port for MQTT/S                                                                  
#define AWS_IOT_MQTT_CLIENT_ID         "MischaTest" ///< MQTT client ID should be unique for every device                                 
#define AWS_IOT_MY_THING_NAME          "MischaTest" ///< Thing Name of the Shadow this device is associated with                          
#define AWS_IOT_ROOT_CA_FILENAME       "root-ca.pem" ///< Root CA file name                                                               
#define AWS_IOT_CERTIFICATE_FILENAME   "1cd9c753bf-certificate.pem.crt" ///< device signed certificate file name                          
#define AWS_IOT_PRIVATE_KEY_FILENAME   "1cd9c753bf-private.pem.key" ///< Device private key filename                                      

To get it running you edit the config header file, copy your certificates and run make. Then you can run the program and see it connect and do stuff like send messages.

successful-run

Once you’ve got a connection set up from your application to the IoT API you’re good to go. Kind of. Now that I had a simple C application building with the Axis ACAP SDK and a sample AWS IoT application building on linux, the next step was to combine them into the ultimo baller cloud-based camera software. This was not so easy.

Most of my efforts towards this were spent tweaking the Makefile to pull in the mbedTLS code, aws_iot code and my application code in a setup that would allow cross-compiling and some semblance of incremental building. I had to up my Make game considerably but in the end I was victorious. You can see the full Makefile in all its glory here.

The gist of it is that it performs the following steps:

  • loads ACAP make definitions (include $(AXIS_TOP_DIR)/tools/build/rules/common.mak)
  • sets logging level (LOG_FLAGS)
  • grab all the source and include files/dirs for mbedTLS and aws_iot
  • define a static library target for all of the aws_iot/mbedTLS code – Screen Shot 2016-03-20 at 2.19.16 PM
  • produce executable:
    Screen Shot 2016-03-20 at 8.39.58 PM.png

The advantage of creating aws-iot.a is that I can quickly build changes to my application source without having to re-link dozens of files.

I combined the Axis logging macros and the aws_iot style logging into one syslog-based system so that I can see the full output when the app is running on the device.

Uploading to the Camera

Once I finally had an ACAP application building I was finally able to try deploying it to a real camera (via make target of course):

Screen Shot 2016-03-20 at 2.18.58 PM

Screen Shot 2016-03-20 at 2.14.21 PM

Getting the app running on the camera and outputting useful logging took quite a bit of effort. I really ran into a brick wall with certificate verification however. My first problem was getting the certs into the package, which was just a simple config change. But then it began failing. Eventually I realized it was because the clock on the camera was not set correctly. Realizing the importance of a proper config, including NTP, I wrote a script to configure a new camera via the REST API. I wanted it to be as simple as possible to run so I wrote it without requiring any third party libraries. It also shares the package uploader config for the camera IP and password so if you’ve already entered it you don’t need to again.

With NTP configured at least there are no more certificate expired errors. I’m able to connect just fine on normal x86 linux, but fails to verify the certs when running on the camera. After asking support, they suggest recompiling mbedTLS with -O0 (disable optimizations) when building on ARM. After doing so, it connects and works!

Screen Shot 2016-03-20 at 2.14.51 PM

🌭🍕🍔 !!!!! Success!

To summarize; at this point we now have an embedded ARM camera device that is able to connect and communicate with the AWS IoT API securely. We can send and receive messages and device shadow states.

So what’s next? Now we need a service for the camera to talk to.