If you remember the old windows music player Winamp, it came with an amazing visualizer named Milkdrop written by a guy at nVidia named Geiss. This plugin performed beat detection and splitting the music into frequency buckets with an FFT and then fed that info into a randomly-selected “preset.” The presets are equations and parameters controlling waveform equations, colors, shapes, shaders,”per-pixel” equations (not actually per-screen-pixel, rather a smaller mesh that is interpolated) and more.
Most of the preset files have ridiculous names like:
“suksma + aderassi geiss – the sick assumptions you make about my car [shifter’s esc shader] nz+.milk”
“lit claw (explorers grid) – i don’t have either a belfry or bats bitch.milk”
“Goody + martin – crystal palace – Schizotoxin – The Wild Iris Bloom – mess2 nz+ i have no character and feel entitled to one.milk”
Milkdrop was originally only for windows and was not open-source, so a few very smart folks got together and re-implemented Milkdrop in C++ under the LGPL license. The project created plugins to visualize Winamp, XMMS, iTunes, Jack, Pulseaudio, ALSA audio. Pretty awesome stuff.
This was a while ago, but recently I wanted to try it out on OSX. I quickly realized that the original iTunes plugin code was out of date by about 10 major versions and wasn’t even remotely interested in compiling, not to mention lacking a bunch of dependencies built for OSX.
So I went ahead and updated the iTunes plugin code, mostly in a zany language called Objective-C++ which combines C++ and Objective-C. It’s a little messed up but I guess it works for this particular case. I grabbed the dependencies and built them by hand, including static versions for OSX in the repository to make it much easier for others to build it (and myself).
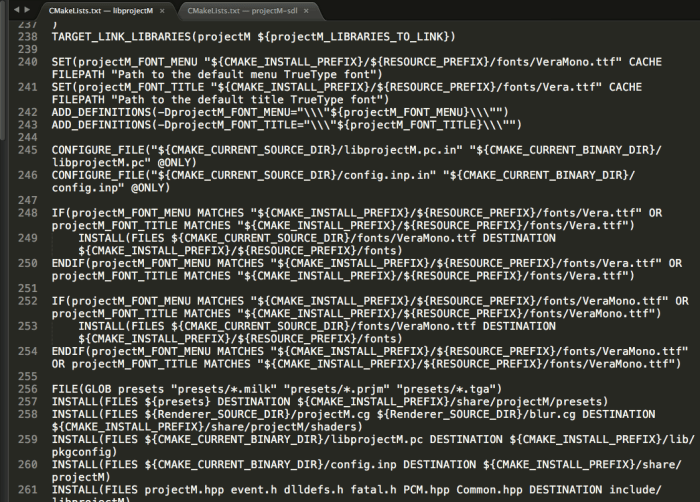
Getting it to build was no small feat either. Someone made the unfortunate decision to use cmake instead of autotools. I can understand the hope and desire to use something better than autotools, but cmake ain’t it. Everything is written in some ungodly undocumented DSL that is unlike any other language you’ve used and it makes a giant mess all over your project folders like an un-housebroken puppy fed a laxative. I have great hope that the new Meson build system will be awesome and let us all put these miserable systems out to pasture. We’ll see.
cmake – not even once
Long story short after a bunch of wrangling I got this all building as a native OSX iTunes plugin. With a bit of tweaking and tossing in the nVidia Cg library I got the quality and rendering speed to be top-notch and was able to reduce the latency between the audio and rendering, although I think there’s still a few frames of delay I’d like to figure out how to reduce.
I wanted to share my plugin with Mac users, so I tried putting it in the Mac App Store. What resulted was a big fat rejection from Apple because I guess they don’t want to release plugins via the app store. You can read about those travails here. I think that unpleasant experience is what got me to start this blog so I could publicly announce my extreme displeasure with Apple’s policies towards developers trying to contribute to their ecosystem.
After trying and failing to release via the app store I put the plugin up on my GitHub, along with a bunch of the improvements I made. I forked the SourceForge version, because SourceForge can go wither and die for all I care.
I ended up trying to get it running in a web page with Emscripten and on an embedded linux device (raspberry pi). Both of these efforts required getting it to compile with the embedded spec for OpenGL, GLES. Mostly I accomplished this by #ifdef’ing out immediate-mode GL calls like glRect(). After a lot more ferocious battling with cmake I got it running in SDL2 on Linux on a Raspberry Pi. Except it goes about 1/5fps, lol. Need to spend some time profiling to see if that can be sped up.
I also contacted a couple of the previous developers and the maintainers on SourceForge. They were helpful and gave me commit access to SF, one said he was hoarding his GLES modifications for the iOS and Android versions. Fair enough I guess.
Now we’re going to try fully getting rid of the crufty old SourceForge repo, moving everything to GitHub. We got a snazzy new GitHub homepage and even our first pull request!
My future dreams for this project would be to make an embedded Linux device that has an audio input jack and outputs visualizations via HDMI, possibly a raspberry pi, maybe something beefier. Apparently some crazy mad genius implemented this mostly in a FPGA but has stopped producing the boards, I don’t know if I’m hardcore enough to go that route. Probably not.
In conclusion it’s been nice to be able to take a nifty library and update it, improve it, put out a release that people can use and enjoy, and work with other contributors to make software for making pretty animations out of music. Hopefully with our fresh new homepage and an official GitHub repo we will start getting more contributors.
I recorded a crappy demo video. The actual visualizer is going 60fps and looks very smooth, but the desktop video recorder I used failed to capture at this rate so it looks really jumpy. It’s not actually like that.
Editing the source of a lambda procedure in AWS can be very cumbersome. Logging in with two-factor authentication and then selecting your lambda and using their web-based “IDE” with nested scroll bars going on on the page is not the greatest. Even worse is if your function actually has dependencies! Then you cannot view the source on the web and must download a zip file, and re-zip and upload it every time you wish to make a change.
After selecting a lambda to edit, it downloads the zip (even if it wasn’t originally a zip), sticks it in a temporary directory and creates a sublime project for you. When you save any of the files it will automatically zip up the files in the project and update the function source automatically, as if you were editing a local file. Simplicity itself.
If you use AWS lambda and Sublime Text, get this plugin! It’ll save you a ton of time. Watch it in action:
Video instructions for installing the plugin from scratch:
Apple stopped including the OpenSSL development headers on recent versions of OSX, trying to get people to move away from the old 0.9.8 version that’s been deprecated for a very long time. Making people stop using this shared library is a Good Thing to be sure but you may come across older software that you want to build for yourself.
If you try to compile a newer version of OpenSSL you will likely find that programs will fail to build against more recent versions because a lot of data structures have been hidden. You may see errors such as:
error: variable has incomplete type 'EVP_PKEY' (aka 'struct evp_pkey_st')EVP_PKEY pk;^/usr/local/include/openssl/ossl_typ.h:92:16: note: forward declaration of 'struct evp_pkey_st'typedef struct evp_pkey_st EVP_PKEY;
If you want to get such code to compile there’s a quick and easy solution! OSX still ships with the 0.9.8 library, you just need to provide the headers. Remove any newer versions of OpenSSL, grab the 0.9.8 sources, and copy over the headers:
In my previous post I describe my adventures in building an AWS IoT-enabled application for a proprietary embedded linux system and getting it to run. The next step in our journey is to create a service that communicates with our device and controls it in a useful way.
What can we do with a system running with the aws_iot library? We can use the MQTT message bus to subscribe to channels and publish messages, and we can diff the current device state against the desired device state shadow stored on the server. Now we need the service side of the puzzle.
My sample IoT application is to be able to view images on an IP camera from anywhere on the internet. I’m planning to incorporate live HD video streaming as well but that is a whole other can of worms we don’t need to open for this demonstration. My more modest goal for now will be to create a service where I can request a snapshot from the camera be uploaded to AWS’s Simple Storage Service (S3) which can store files and serve them up to authenticated users. In addition I will attempt to build the application server logic around AWS Lambda, a service for running code in response to events without actually having to deploy a server or run a daemon of any sort. If I can manage this then I will have a truly cloud-based service; one that does not consume any more resources than are required to perform its job and with no need to pre-allocate any servers or storage. It will be running entirely on Amazon’s infrastructure with only small bits of configuration, policy and code inserted in the right places to perform the relatively simple tasks required of my app. This is the Unemployed DevOps lifestyle, the dream of perfect lazy scalability and massive offloading of effort and operations to Amazon. There is of course a large downside to this setup, namely that I am at the mercy of Amazon. If they are missing a feature I need then I’m pretty much screwed and if their documentation is poor then I will suffer enormously. A partial description of my suffering and screwed state continues below.
I’ve been bitten before by my foolish impetuousness in attempting to use new AWS services that have clearly not been fully fleshed out. I was an early adopter of the CodeDeploy system, a super useful and nifty system for deploying changes to your application on EC2 instances from S3 or even straight from GitHub. Unfortunately it turned out to not really be finished or tested or documented and I ended up wasting a ton of time trying to make it work and deal with corner cases. It’s a dope service but it’s really painfully clear nobody at AWS has ever bothered to actually try using it for a real application, and all of my feature requests and bug reports and in-person sessions with AWS architects have all resulted in exactly zero improvements despite my hours of free QA I performed for them. As a result I am now more cautious when using new AWS services, such as IoT and Lambda.
In truth attempting to make use of the IoT services and client library has been one of the most frustrating and difficult uphill battles I’ve ever waged against a computer. The documentation is woefully incomplete, I’ve wasted tons of time guessing at what various parameters should be, most features don’t really behave as one would expect and the entire system is just super buggy and non-deterministic. Sometimes when I connect it just fails. Or when subscribing to MQTT topics.
Usually this doesn’t happen. But sometimes it does!
Why does it disconnect me every few seconds? I don’t know. I enabled autoReconnect (which is a function pointer on a struct unlike every other function) so it does reconnect at least, except when it just fails for no apparent reason.
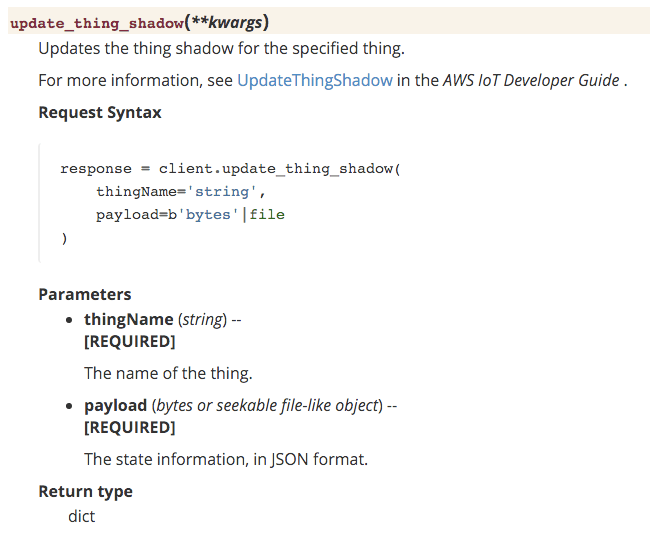
On the boto3 (python AWS clienet library) side things are not really any better. The device shadow support (called IoT Dataplane) documentation is beyond unhelpful at least as of this writing. If you want to update a device state dictionary (its “shadow”) in python, say, in a lambda, you call the following method:
Usually when you want to specify a dictionary-type object as a param in python it’s customary to pass it around as a dict. It’s pretty unusual for an API that is expecting a dictionary data structure to expect you to already have encoded it as JSON, but whatever. What is really missing in this documentation is the precise structure of the update payload JSON string you’re supposed to pass in. You’re supposed to pass in the desired new state in the format {“state”: { “desired”: { … } } }:
If you hunt around from the documentation pages referenced by the update_thing_shadow() documentation you may uncover the correct incantation, though not on the page it links to. It would really save a lot of time if they just mentioned the desired format.
I really definitely have no reason why it wants a seekable object for the payload since it’s not like you can really send files around. I actually first attempted to send an image over the IoT message bus with no luck, until I realized that the biggest message that can ever be sent over it is 128k. This application would be infinitely simpler if I could transmit the image snapshot over my existing message bus but that would be too easy. I am fairly certain my embedded linux system can handle buffering many megabytes of data and my network is pretty solid, it’s really a shame that AWS is so resource-constrained!
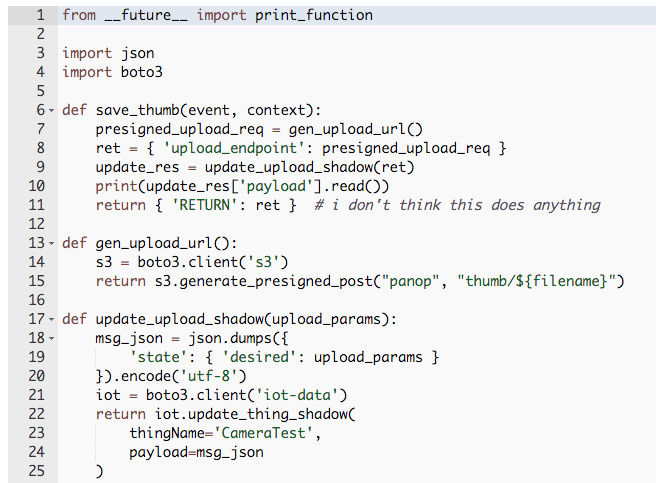
The reason I am attempting to use the device shadow to communicate is that my current scheme for getting an image from the device into AWS in lieu of the message bus is:
The camera sends a MQTT message that indicates it is online
When the message is received, a DevicePolicy matches the MQTT topic and invokes a lambda
The lambda generates a presigned S3 request that will allow the client to upload a file to an S3 bucket
The lambda updates the device shadow with the request params
A device shadow delta callback on the camera is triggered (maybe once, maybe twice, maybe not at all, by my testing)
Callback receives the S3 request parameters and uploads the file via libcurl to S3
Can now display thumbnail to a web client from S3
I went to the AWS Loft to talk to an Amazon architect, a nice free service the company provides. He didn’t seem to know much about IoT, but he spoke with some other engineers there about my issues. He said there didn’t appear to be any way to tell what client sent a message, which kind of defeats the entire point of the extra security features, and he was going to file an internal ticket about that. As far as uploading a file greater than 128k, the above scheme was the best we could come up with.
Regarding the security, I still am completely at a loss as to how one is supposed to manage more than one device client at a time. You’re supposed to create a “device” or a “Thing”, which has a policy and unique certificate and keypair attached to it and its own device shadow state. I assume the keypair and device shadows are supposed to be associated with a single physical device, which means you will need to automate some sort of system that provisions all of this along with a unique ThingName and ClientID for each physical device and then include that in your configuration header and recompile your application. For each device, I guess? There is no mention of what exactly how provisioning is supposed to work when you have more than one device, and I kinda get the feeling nobody’s thought that far ahead. Further evidence in support of this theory is that SNS messages or lambdas that are invoked from device messages do not include any sort of authenticated ClientID or ThingName, so there’s no way to know where you are supposed to deliver your response. Right now I just have it hard-coded to my single Thing for testing. I give Amazon 10/10 for the strict certificate and keypair verification, but that’s only one part of a scheme that as far as I can tell has no mechanism for verifying the client’s identity when invoking server-side messages and code.
It wasn’t my intention to bag on AWS IoT, but after months of struggling to get essentially nowhere I am rather frustrated. I sincerely hope that it improves in usableness and stability because it does have a great deal of powerful functionality and I’d very much like to base my application on it. I’d be willing to help test and report issues as I have in the past, except that I can’t talk to support without going in to the loft in person or paying for a support plan, and the fact that all of my previous efforts at testing and bug reporting have added up to zero fixes or improvements doesn’t really motivate me either.
If I can get this device shadow delta callback to actually work like it’s supposed to I’ll post more updates as I progress. It may be slow going though. The code, such as it is, is here.
I’m more allergic than most people to buzzwords. I cringe big time when companies suddenly start rebranding their products with the word “cloud” or tack on a “2.0”. That said, I realize that the cloud is not just computers in a datacenter and the Internet of Things isn’t all meaningless hype either. There exists a lot of cool new technology, miniaturization, super cheap hardware of all shapes and sizes and power requirements, ever more rapid prototyping and lot more that adds up to what looks like a new era in embedded system hardware.
People at the embedded linux conference can’t wait to tell you about IoT stuff
But what will drive this hardware? There is a lot of concern about the software that’s going to be running on these internet-connected gadgets because we all just know that the security on most of these things is going to be downright laughable, but now since they’re a part of your car, your baby monitor, your oven, your insulin pump and basically everything, this is gonna be a big problem.
So I’ve embarked on a project to try to build an IoT application properly and securely. I think it’ll be fun, a good learning experience, and even a useful product that I may be able to sell one day. At any rate it’s an interesting technical challenge.
My project is thus: to build a cloud-based IoT (ughhh sorry) IP camera for enterprise surveillance. It will be based on as much open source software as possible, ABRMS-licensed, mobile-first and capable of live streaming without any video transcoding.
I think I know how to do this, I’ve written a greatdeal of real-timestreamingsoftware in the past. I want to offload as much as the hard stuff as possible; let the hardware do all the h.264 encoding and let AWS manage all of the security, message queueing and device state tracking.
At the Dublin gstreamer conference I got to chat up an engineer from Axis, an awesome Swedish company that makes the finest IP cameras money can buy. He informed me that they have a new program called ACAP (Axis Camera Application Platform) which essentially lets you write what are essentially “apps” that are software packages that can be uploaded to their cameras. And they’re all running Linux! Sweet!
And recently I also learned of a new IoT service from Amazon AWS. I was dreading the humongo task of writing a whole new database-backed web application and APIs for tracking devices, API keys, device states, authentication, message queueing and all of that nonsense. Well it looks like the fine folks at Amazon already did all the hard work for me!
So I had my first development goal: create a simple AWS-IoT client and get it to run on an Axis camera.
Step one: get access to ACAP
Axis doesn’t really make it very easy to join their development program. None of their API documentation is public. I’m always very wary of companies that feel like they need to keep their interfaces a secret. What are you hiding? What are you afraid of? Seems like a really weird thing to be a control freak about. And it majorly discourages developers from playing around with your platform or knowing about what it can do.
But that is a small trifle compared to joining the program. I filled out a form requesting access to become a developer and was eventually rewarded with a salesbro emailing me that he was busy with meetings for the next week but could hop on a quick call with me to tell me about their program. I informed them that I already wanted to join the program and typed all the relevant words regarding my interest into their form and didn’t need to circle back with someone on a conference call in a few weeks’ time, but they were really insistent that they communicate words via telephone.
After Joe got to give me his spiel on the phone I got approved to join the Axis developer partner program. As far as ACAP they give you a SDK which you can also download as an Ubuntu VirtualBox image. Inside the SDK is a tutorial PDF, several cross-compiler toolchains, some shady Makefile includes, scripts for packaging your app up and some handy precompiled libraries for the various architectures.
Basically the deal is that they give you cross-compilers and an API for accessing bits of the camera’s functionality, things like image capture, event creation, super fancy storage API, built-in HTTP server CGI support, and even video capture (though support told me vidcap super jankity and I shouldn’t use it). The cross-compilers support Ambarella ARM, ARTPEC (a chip of Axis’s design) and some MIPS thing, these being the architectures used in various Axis products. They come with a few libraries all ready to link, including glib, RAPP (RAster Processing Primitives library) and fixmath. Lastly there’s a script that packages your app up, building a fat package for as many architectures as you want, making distribution super simple. Now all I had to do was figure out how to compile and make use of the IoT libraries with this build system.
Building mbedTLS and aws_iot
AWS has three SDKs for their IoT clients: Arduino Yún, node.js and embedded C linux platforms. The Arduino client does sound cool but that’s probably underpowered for doing realtime HD video, and I’m not really the biggest node.js fan. Linux embedded C development is where it is at, on the realz. This is the sort of thing I want to be doing with my life.
Word
All that I needed to do was create a Makefile that builds the aws_iot client library and TLS support with the Axis toolchain bits. Piece of cake right? No, not really.
The IoT AWS service takes security very seriously, which is super awesome and they deserve props for forcing users to do things correctly: use TLS 1.2, include a server certificate and root CA cert with each device and give each device a private key. Wonderful! Maybe there is hope and the IoT future will not be a total ruinfest. The downside to this strict security of course is that it is an ultra pain in the ass to set up.
You are offered your choice of poison: OpenSSL or mbedTLS. I’d never heard of mbedTLS before but it looked like a nice little library that will get the job done that isn’t a giant bloated pain in the ass to build. OpenSSL has a lot of build issues I won’t go into here.
To set up your app you create a key and cert for a device and then load them up in your code:
Simple enough. Only problem was that I was utterly confused by what these files were supposed to be. When you set up a certificate in the IoT web UI it gives you a public key, a private key and a certificate PEM. After a lot of dumbness and AWS support chatting we finally determined that rootCA referred to a secret CA file buried deep within the documentation and the public key was just a bonus file that you didn’t need to use. In case anyone else gets confused as fuck by this like I was you can grab the root CA file from here.
The AWS IoT C SDK (amazon web services internet of things C software development kit) comes with a few sample programs by way of documentation. They demonstrate connecting to the message queue and viewing and updating device shadows.
#defineAWS_IOT_MQTT_HOST"B13C0YHADOLYOV.iot.us-west-2.amazonaws.com"///< Customer specific MQTT HOST. The same will be used for Thing Shadow#defineAWS_IOT_MQTT_PORT8883 ///< default port for MQTT/S #defineAWS_IOT_MQTT_CLIENT_ID"MischaTest"///< MQTT client ID should be unique for every device#defineAWS_IOT_MY_THING_NAME"MischaTest"///< Thing Name of the Shadow this device is associated with #defineAWS_IOT_ROOT_CA_FILENAME"root-ca.pem"///< Root CA file name#defineAWS_IOT_CERTIFICATE_FILENAME"1cd9c753bf-certificate.pem.crt"///< device signed certificate file name #defineAWS_IOT_PRIVATE_KEY_FILENAME"1cd9c753bf-private.pem.key"///< Device private key filename
To get it running you edit the config header file, copy your certificates and run make. Then you can run the program and see it connect and do stuff like send messages.
Once you’ve got a connection set up from your application to the IoT API you’re good to go. Kind of. Now that I had a simple C application building with the Axis ACAP SDK and a sample AWS IoT application building on linux, the next step was to combine them into the ultimo baller cloud-based camera software. This was not so easy.
Most of my efforts towards this were spent tweaking the Makefile to pull in the mbedTLS code, aws_iot code and my application code in a setup that would allow cross-compiling and some semblance of incremental building. I had to up my Make game considerably but in the end I was victorious. You can see the full Makefile in all its glory here.
The gist of it is that it performs the following steps:
loads ACAP make definitions (include$(AXIS_TOP_DIR)/tools/build/rules/common.mak)
sets logging level (LOG_FLAGS)
grab all the source and include files/dirs for mbedTLS and aws_iot
define a static library target for all of the aws_iot/mbedTLS code –
produce executable:
The advantage of creating aws-iot.a is that I can quickly build changes to my application source without having to re-link dozens of files.
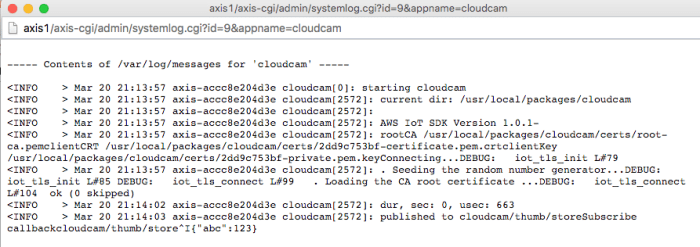
I combined the Axis logging macros and the aws_iot style logging into one syslog-based system so that I can see the full output when the app is running on the device.
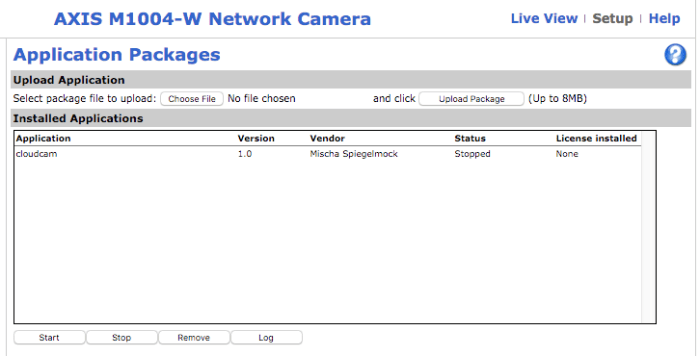
Uploading to the Camera
Once I finally had an ACAP application building I was finally able to try deploying it to a real camera (via make target of course):
Getting the app running on the camera and outputting useful logging took quite a bit of effort. I really ran into a brick wall with certificate verification however. My first problem was getting the certs into the package, which was just a simple config change. But then it began failing. Eventually I realized it was because the clock on the camera was not set correctly. Realizing the importance of a proper config, including NTP, I wrote a script to configure a new camera via the REST API. I wanted it to be as simple as possible to run so I wrote it without requiring any third party libraries. It also shares the package uploader config for the camera IP and password so if you’ve already entered it you don’t need to again.
With NTP configured at least there are no more certificate expired errors. I’m able to connect just fine on normal x86 linux, but fails to verify the certs when running on the camera. After asking support, they suggest recompiling mbedTLS with -O0 (disable optimizations) when building on ARM. After doing so, it connects and works!
🌭🍕🍔 !!!!! Success!
To summarize; at this point we now have an embedded ARM camera device that is able to connect and communicate with the AWS IoT API securely. We can send and receive messages and device shadow states.
So what’s next? Now we need a service for the camera to talk to.
Now that we live in the age of ~the cloud~ it strikes me that for many software projects the traditional roles of system administrator and their more recent rebranded “DevOps” are not strictly required.
I can’t speak much to other cloud hosting platforms but Amazon Web Services really is the flyest shit. All of Amazon’s internal infrastructure has been built with APIs to control everything for many years by decree of Jeff Bezos, the CEO. This was a brilliant requirement that he mandated because it allowed Amazon to become one of the first companies able to re-sell its spare server capacity and make their automated platform services available to everyday regular developers such as myself. They’ve been in the business of providing service-oriented infrastructure to anyone with a credit card longer than most everything, and their platform is basically unmatched. Whereas before setting up a fancy HTTPS load balancer or highly available database cluster with automated backups was a time-consuming process, now a few clicks or API calls will set you up with nearly any infrastructure your application requires, with as much reliability and horsepower as you’re willing to pay for.
I’ve heard some people try to argue that AWS is expensive. This is true if you use it like a traditional datacenter, which it’s not. If you try running all your own services on EC2 and pay an army of expensive “DevOps” workers to waste time playing with Puppet or Chef or some other nonsense then perhaps it’s a bit costly. Though compared with power, bandwidth, datacenter, sysadmin and hardware costs and maintenance overheard of running on your own metal I still doubt AWS is going to run you any more. In all likelihood your application really isn’t all that special. You probably have a webserver, a database, store some files somewhere, maybe a little memcached cluster and load balancer or two. All this can be had for cheap in AWS and any developer could set up a highly available production-ready cluster in a few hours.
Us software engineers, we write applications. These days a lot of them run on the internet and you wanna put them somewhere on some computers connected to the internet. Back in “the day" you might have put them on some servers in a datacenter (or your parents’ basement). Things are a little different today.
Some time ago I moved my hosting from a traditional datacenter to AWS. I really didn’t know a lot about it so I asked the advice of some smart and very experienced nerds. I thought it would be pretty much the same as what I was doing but using elastic compute instances instead of bare metal. They all told me “AWS is NOT a datacenter in the cloud. Stop thinking like that.”
For example, you could spin up some database server instances to run MySQL or PostgreSQL OR you could just have AWS do it for you. You could set up HAproxy and get really expensive load balancers, or simply use an elastic load balancer. Could run a mail server if you’re into that, but I prefer SES. Memcached? Provided by ElastiCache. Thinking of setting up nagios and munin? CloudWatch is already integrated into everything.
Point being: all the infrastructure you need is provided by Amazon and you don’t need to pay DevOps jokers to set it up for you. AWS engineers have already done all the work. Don’t let smooth-talking Cloud Consultants talk you into any sort of configuration management time-wasters like Puppet. Those tools impose extra overhead to make your systems declaratively configured rather than imperatively because they are designed for people who maintain systems. In EC2-land you can and should be able to kill off any instance at any time and a new one will pop up in its place, assuming you’re using autoscaling groups. You are using ASgroups, right? You will be soon!
When you can re-provision any instance at will, there is no longer any need to maintain and upgrade configuration. Just make a new instance and terminate the old ones. Provision your systems using bash. Or RPMs if you want to get really fancy. You really don’t need anything else.
I’m a fan of Amazon Linux, which is basically just CentOS. I use a nifty yum plugin that lets me store RPMs in the Simple Storage Service (S3) and have instances authenticate via IAM instance roles. This is a supremely delightful way of managing dependencies and provisioning instances.
The last piece of the puzzle is orchestration; once you have all of your infrastructure in place you still need to perform tasks to maintain it. Updating your launch configurations and autoscaling groups, deploying code to your servers, terminating and rebuilding clusters, declaring packages to be installed on EC2 with cloud-init and so on. You could do all of this by hand maybe or script it, except that you don’t have to because I already did it for you!
To be totally honest, my AWS setup is pretty freaking sweet. The reason it is freaking sweet is because I listened to grumpy old AWS wizards and took notes and built their recommendations into a piece of software I call Udo – short for Unemployed DevOps.
Udo is a pretty straightforward application. It essentially provides a configuration-driven command-line interface to Boto, which is the python library for interfacing with the AWS APIs. It is mostly centered around autoscaling groups, which are a very powerful tool not only for performing scaling tasks but also for logically grouping your instances. In your configuration file you can define multiple clusters to group your ASgroups, and then define “roles” within your clusters. I use this system to create clusters for development, QA, staging and production, and then in each cluster I have “webapp” roles and “worker” roles, to designate instances which should handle web requests vs. asynchronous job queue workers. You can of course structure your setup however you want though.
Using Udo is as simple as it gets. It’s a python module you can install like any other (sudo easy_install udo). Once it’s installed you create a configuration file for your application’s setup and a Boto credentials file if you don’t already have one. Then you can take it for a spin.
The cluster/role management feature is central to the design. It makes it so you never have to keep track of individual instances or keep track of IP addresses or run any sort of agents on your instances. Finding all of your stage webapp server IPs for example is as easy as looking up the instances in the stage-webapp autoscaling group. You can easily write tools to automate tasks with this information. We have a script that allows you to send commands to an autoscaling group via SSH, which works by reading the external IPs of the instances in the group. This is so useful we plan on adding it to Udo sometime in the near future, but it’s an example of the sort of automation that would normally require fancy tools and daemons or keeping track of IPs in some database somewhere, but is totally simplified by making use of the tools which Amazon already provides you.
Udo has a few nifty features on offer. One handy command is “updatelc” – update launchconfiguration. Normally you cannot modify a launch configuration attached to an autoscaling group, so Udo will instead create a copy of your existing launchconfig and then replace the existing launchconfig on your asgroup, allowing you to apply udo.yml configuration changes without terminating your asgroup. Very handy for not having to bring down production to make changes.
Another powerful feature is tight integration with CodeDeploy, a recent addition to the AWS ops tools suite. As far as I’m aware Udo is the first and only application to support CodeDeploy at this time and I actually have an epic support ticket open with a sizable pile of feature requests and bug reports. Despite its rather alpha level of quality it is extremely handy and we are already using it in production. It allows AWS to deploy a revision straight from GitHub or S3 to all instances in an autoscaling group or with a particular tag, all without any intervention on your part other than issuing an API call to create a deployment. You can add some hooks to be run at various stages of the deployment for tasks like making sure all your dependencies are installed or restarting your app. I’d honestly say it’s probably the final nail in the coffin for the DevOps industry.
I use UNIX-based systems quite a lot in my daily life. Linux servers, Mac OS X for my desktop, Android for my phone, and so on. The UNIX specification powers most modern software and technology so I’ve found it fun to read up a bit on the history of it. One highly entertaining historical document I found long ago was the UNIX Haters Handbook. While the technical details described therein are extremely dated today one wonders if the general thrust of the book is still relevant. Specifically that “UNIX weenies” (to use the handbook’s phraseology) are rigid, stuck in the past, resistant to progress and proud of comically ugly hackjobs.
While this may seem harsh considering the virulent success of the UNIX model, I wondered if there might be some truth to all of this entertainingly-packaged vitriol in the pages of the haters from a time before mine. I set out to see if there was some merit to their claims.
There is a very famous quote from one of the original designers and implementors of UNIX, a highly accomplished man named Ken Thompson whom I admire. When asked what he would change if he could do UNIX all over again, he replied “I’d spell creat with an e”. This is a reference to the flag O_CREAT in the open() function in the C standard library and the associated system call. If you look at the reference documentation for the flags to open() you can see that there is a certain “style” to the naming of the flags. Let’s call it lazy typist style. O_RDONLY, O_RDRW, O_EXCL, etc…
I can only assume that Mr. Thompson got a little too carried away with this style and left off the ‘e’ on O_CREAT, and now regrets this mistake. When given the chance to correct it on the operating system interface in Go he famously made the first public commit (with an assist by Rob Pike) on the project to correct the spelling with what I can only imagine was great aplomb and satisfaction.
One must appreciate this great man’s legacy and his determination to correct such a trivial error that has persisted for so many years. It inspired me to see if it was possible to correct this mistake in the UNIX standard, adhered to by every operating system from Apple’s OSX to Linux to BSD and even Windows. This standard is known as “POSIX”.
POSIX is an acronym for Portable Operating System Interface.
…
The name POSIX was suggested by Richard Stallman. It is expected to be pronounced pahz-icks, as in positive, not poh-six, or other variations. The pronunciation has been published in an attempt to promulgate a standardized way of referring to a standard operating system interface.
So I decided to try to correct this simple spelling mistake left over from the 1960’s. After all, how hard could it be?
I decided to start small, simply adding an alias to the GNU standard C library implementation. This is essentially the “GNU” in “GNU/Linux” that Mr. Stallman is always harping about. Now, please note that I did not attempt to rename O_CREAT to O_CREATE, I merely added a definition for O_CREATE so that people writing code in this millennium could benefit from this correction going forward. Actually changing the definition of O_CREAT would break basically everything everywhere. So I proposed my change in the #glibc IRC channel with underwhelming results.
Long story short, glibc did not seem receptive to my change, which is somewhat reasonable. glibc is an implementation of the POSIX standard, and the ideal way to make this change would be to get the proper spelling included in the standard itself. Then no doubt the glibc project would be delighted to accept my one-line addition.
So let’s try making a change to POSIX. I wonder what is involved?
POSIX is a standard (ratified by the IEEE), though the actual standard itself is decided upon by a nefarious group known as the Austin Common Standards Revision Group. I invite you to take a look at their sweet homepage. It’s really an amazing site.
Bracing myself, I dug deeper. Where do I submit a proposal to correct a typo? Maybe I will try the mailing list, since many old-school open source projects still use those to submit patches.
(I love the sweet HTML 1.0 <TABLE BORDER=2> style btw)
Also, I was informed that I must use “proper netiquette” on this list. What nostalgia.
Okay, so to subscribe I need an account with the Open Group. Sounds promising. Who doesn’t love open standards??
Should be no problem. Just a small perfunctory form to fill out…
A half hour later, I’m in!
Uh… cool I guess? This is a really sweet PHP app by the way. If you click too hard it sorta falls over.
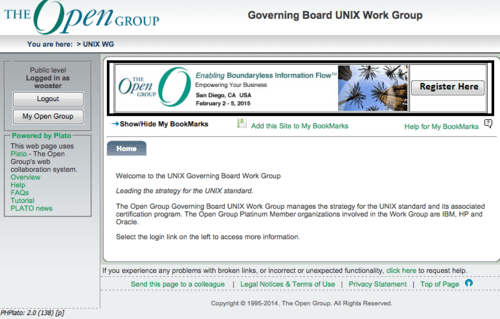
Moving on. After some searching I found a page that mentions leading the strategy for the UNIX standard. Is this what I want? Unsure. I wonder if I need to be a “platinum member” to work on it?
????????
Getting nowhere, I decide to try and find the last POSIX revision publication they put out. It’s Open and stuff, right? I find a sweet download link. Ah, but I must verify my email address before downloading the PDF describing the revisions. Can’t be too careful these days.
After some fun times resetting my password because it appeared to forget it and their captcha system didn’t actually work, I was fortunate enough to get a nice download link.
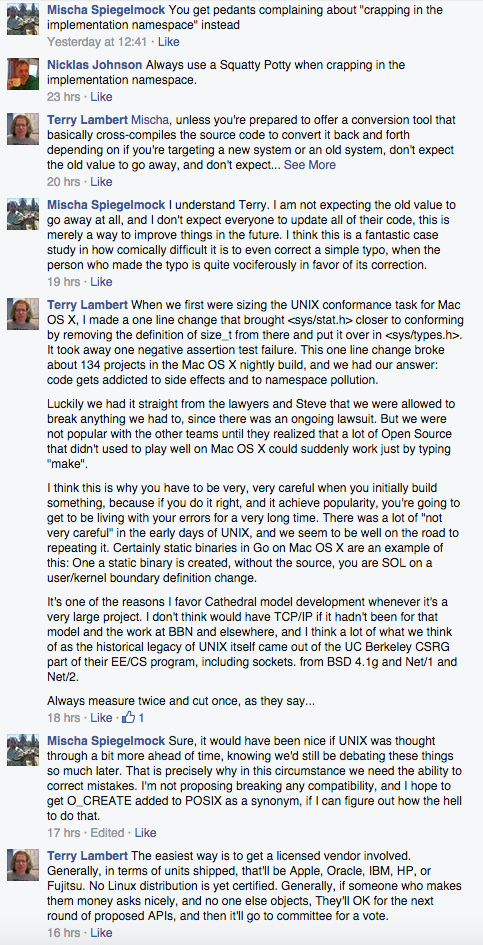
I find these jerks:
Well… I mean I’m sure some of those people are good guys. I didn’t mean to imply that ALL of them are jerks, though some of them must be responsible for this sad state of affairs. I did recognize at least one name on that list… oh yeah it’s this guy who accused me of “crapping in the implementation namespace.”
Ah, just write a cross-compiler and get a licensed vendor involved! Of course! Or just make the Open Group a giant pile of money to get my change approved. Good to know.
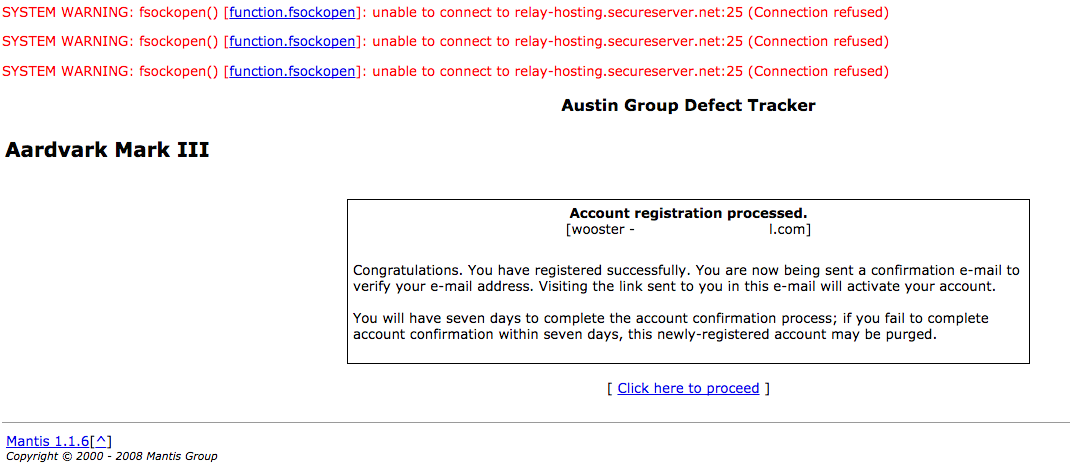
Obviously that won’t be happening any time soon, at least if I can help it. Let’s try another approach. After some more surfing the world wide web circa 1996 I come across a bug tracker for the Austin Group. Maybe I can report a bug! Just need to register, once more.
Well… okay. Nice mail system (godaddy) there. I think the chapter on sendmail in the UNIX Haters Handbook is my favorite, just by the way.
In which I attempt to correct a mistake made by Ken Thompson, one the of the original designers of Unix:
diff --git a/bits/fcntl.h b/bits/fcntl.h
 index f273f84..43e8e6b 100644
 --- a/bits/fcntl.h
 +++ b/bits/fcntl.h
 @@ -29,6 +29,7 @@

/* Bits OR'd into the second argument to open. */
 #define O_CREAT 0x0200 /* Create file if it doesn't exist. */
 +#define O_CREATE 0x0200 /* Create file if it doesn't exist. */
 #define O_EXCL 0x0800 /* Fail if file already exists. */
 #define O_TRUNC 0x0400 /* Truncate file to zero length. */
 #define O_NOCTTY 0x8000 /* Don't assign a controlling terminal. */
16:08 < wooster> what do you guys think of my patch? http://pastebin.com/raw.php?i=B8gfZG1m 17:26 < azanella_> wooster, http://pubs.opengroup.org/onlinepubs/9699919799/ 17:26 < wooster> my patch is still POSIX-compliant 17:26 < wooster> i did not rename it 17:27 < azanella_> wooster, so which specification defines O_CREATE? 17:28 < wooster> i am merely acceding to Ken Thompson‘s wishes
17:28 < wooster> http://unix.stackexchange.com/questions/10893/what-did-ken-thompson-mean-when-he-said-id-spell-create-with-an-e
17:28 < wooster> O_CREATE is not defined in a specification, but it is not prohibited either by any specification
17:29 < azanella_> wooster, which is the gain of adding a non standard type on glibc? what happen if a program uses it and try to compile on a system that does not define?
17:29 < wooster> is every single thing in glibc only implemented if it is defined in a standard? everything?
17:30 < azanella_> wooster, no, but the extension either make sense to fix an not specified trait or necessity
17:31 < azanella_> this does not add anything, in fact only add confusion because it is a field to duplicate an already define field
17:31 < wooster> as i said, i am attempting to correct an error that ken thompson regrets making
17:31 < wooster> better late than never
17:31 < wooster> and i am attempting to do it in a backwards-compatible fashion
17:32 < azanella_> to late, this change is useless
17:32 < azanella_> imho
17:32 < wooster> i’ll take ken thompson‘s judgement over yours
17:32 < wooster> no offense
17:35 < azanella_> sure, fell free to send a patch to libc-alpha
17:35 < wooster> thank you
17:35 < wooster> i shall
17:35 < azanella_> I am just foreseeing the possible answer to your patches
17:36 < azanella_> people try to avoid such useless changes that do not follow any specification
17:36 < wooster> understandibly
17:37 < wooster> however, you must admit that the design of unix was not 100% perfect the first time around, and it is useful to have the ability to correct mistakes, especially those mentioned rather famously by one of the original authors
17:41 < azanella_> wooster, in this specific case this change does not make sense, the compiler will get any typo error, there is no gain in expressiveness and you add a non-specification change, that will require additional prepcoressor defines
17:45 < wooster> i accuse you of standing in the way of progress
17:45 < azanella_> right…
17:45 < wooster> i will post to libc-alpha
17:47 < wooster> in the meantime may i suggest some light reading on the subject: http://web.mit.edu/~simsong/www/ugh.pdf
17:47 < azanella_> alright ….
Unix cannot move forward if everyone is resistant to fixing defects in the original design. This mentality of preserving the original misspellings is as much a blight on the POSIX standard as the spelling of “Referer” in the HTTP header specification. We can do better. Adding a vowel should not be obstructed with charges of “that will require additional prepcoressor defines”.
I noticed in a thread elsewhere on the internet that this mistake was corrected in the Go language Apr 04 23:42:14 2011 with Ken’s blessing.